Simple Elevator Repair Tips
February 12, 2022
10 Things To Know Before Installing a Home Lift in Singapore
March 31, 2022How To Repair A Lift Motor?

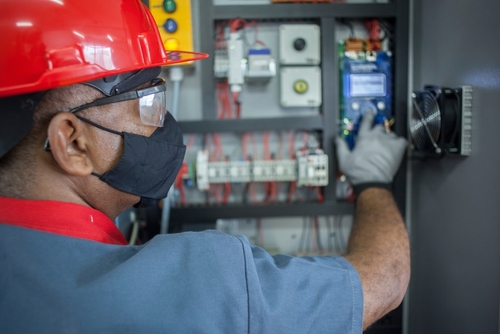
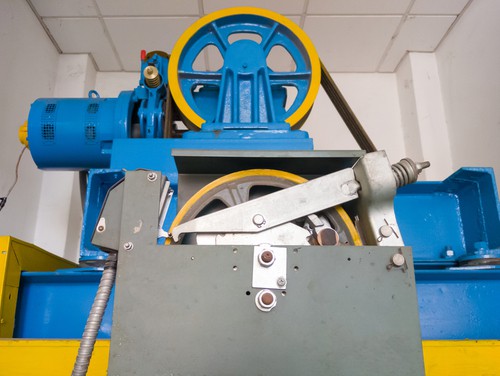
How To Repair A Lift Motor? A lift motor can stop working and need to be repaired. If you don’t know how to repair lift motors, it could cost you thousands of dollars. The problem is that there are hundreds of different ways a lift motor could lift break down and fail.
To complicate things further, it’s rare for a professional mechanic to diagnose the problem because he or she may not have seen this specific issue before. Even if you do find an expert who has experience with lift motors, there will still be a steep learning curve as he or she needs to understand the unique problems associated with this type of equipment.
Positively, there is an excellent way to identify problems with your lift motors and eliminate expensive repairs before they even happen. The solution is to make sure you regularly inspect your lifts. If you do so in the proper way, you will be able to stop a potentially expensive repair in its tracks before it begins.
Positively, there is no better time than now to learn how to service lift motors. There are numerous online resources that can help get you started in no time. Here are some basic steps that can help you troubleshoot lift motors:
STEP 1: Gather Your Materials
You will need a lift motor, a multimeter, a voltmeter, a light source, and possibly a flashlight. There is no better time to get into the habit of always having this equipment handy.
STEP 2: Read the Motor’s Instructions
Read through the entire lift motor manual or look up the manufacturer’s instructions online to make sure you know what the specific problem is and what actions you should take if it happens. Knowing the cause of the failure is important because it allows you to quickly decide if the motor is salvageable.
STEP 3: Measure the Voltage
You can use the voltmeter to measure the voltage on the power supply wires and check the reading for the voltage as well. If you find that the current is excessive, then there is a short somewhere in the wiring or in the lift motor itself.
STEP 4: Disconnect the Motor
To disconnect the lift motor, you will need to disconnect it from the wiring and harness. To do this, you will first need to remove the wire connector from the motor.
Remove the wire connector by pushing it out of the side of the lift motor. Next, you will need to remove the cover on the motor. This will allow you to access the wires that connect to the lift motor.
Next, you will need to disconnect the lift arm from the motor by unbolting the arm from the motor. You will then have to remove the drive belt that is connecting the lift arm to the motor. Finally, you will have to disconnect the electrical connection from the lift arm.
STEP 5: Take Off the Case
To get started, you will need to remove the lift motor from the lift case. Lift cases are similar to regular equipment cabinets and have the same size opening as a standard door.
Lift cases typically contain the mechanical gears and components that control the lift, but also provide a place for the lift to sit. This is the best place to start because most issues occur with the lift motor itself. If the lift case has been properly cleaned and maintained, the lift motor should slide out easily.
STEP 6: Remove the Rotor
The rotor in this lift motor will only come out when you remove it from the case. To do so, you will first need to loosen the mounting bolts and pull the rotor assembly away from the driveshaft.
Then you will have to unbolt the mounting bolts that are holding the rotor to the drive shaft. You will then have to remove the rotor from the shaft. Finally, you will have to unscrew the mounting bolts on the end of the drive shaft that is closest to the motor.
STEP 7: Check the Power Supply
The first step in testing the power supply is to measure the current that is running through the power supply wires. Make sure that the power supply wires are not carrying excessive amperage or voltage. Next, you will need to check the voltage for the wires that go to the lift arm.
STEP 8: Replace the Rotor
Next, you will have to install the rotor back into the driveshaft and tighten the mounting bolts. Finally, you will have to tighten the mounting bolts that hold the end of the shaft to the case. Compared to normal lift motors, this motor uses different types of mounting bolts that must be replaced after each time you want to move the lift up and down.
STEP 9:
Reconnect the Lift Once everything is properly tightened up, you will have to connect the liftback together. Before you reconnect the lift to the motor, make sure that there is no excessive voltage running through the lift’s wiring. If there is, you will need to correct this by re-terminating the wire to the lift.
Next, you will need to reconnect the power supply. Then you will need to reattach the lift arm and tighten all of the mounting bolts. This should fix the problem and give you some peace of mind as you get ready for another season of your life. What’s next? After you have solved your issue, it’s time to enjoy your new lift!
How To Repair A Lift Motor? – Conclusion
By following the steps on this page, you will be able to repair a lift motor yourself without calling a technician. However, you will have to be careful when you are trying to diagnose the problem and repair your lift motor. Most people who have experience working with lift motors can easily figure out that they have a faulty motor.
In these cases, it is not always clear whether the lift motor has a broken or loose wire, a bad motor, or a worn drive belt.
Even if a technician can correctly identify your lift motor’s problem, he may not be able to fix it. The last thing you want is to call a technician for repairs only to discover that the lift still won’t work. This is why you need to know how to fix lift motors on your own. If you learn how to repair lift motors, you can get them working again before you need to call a technician in Singapore.